
Training of the mind and body leads to awareness of the soul.
—B.K.S. IYENGAR
Rope wall comments and instructions
Original rope wall design credited to BKS Iyengar. This rope wall system was modified by John Obendorfer and Eddy Marks. I believe it has several benefits to recommend it:
- The finished wall is completely flush so standing poses with the back to the wall can be done without running into any projections. Also since there is no molding at the floor there is a true right angle from wall to floor which is very handy
- The wall is sturdy and can not be damaged through regular and heavy use
- It is attractive
- It requires little cleaning compared to drywall which is quickly dirtied by heel and hand marks from full arm balance, pinchamayurasana, etc.
- The hand hold recesses are comfortable and convenient for walking up the wall and doing wall kapotasana from the top ropes
- The wall is quiet-no squeaks
- The wall is constructed from common materials with common tools
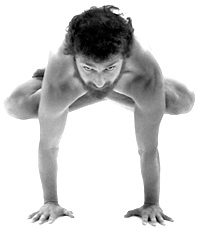
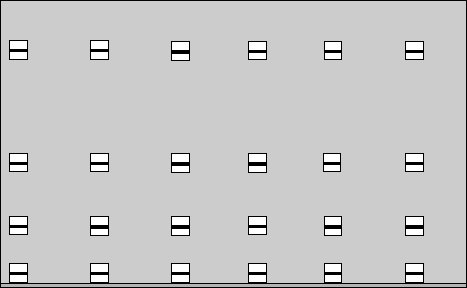
The hip height hand holds were designed to accept one end of a special folding horse prop so that an entire class can work on the horse without the inconvenience of maintaining 7 or so full size horses! The second group of hand holes up from the floor is optionally used for tying the legs to the wall in Viparitta Karani. It can be eliminated without concern as it is not nearly as useful as the other three traditional locations.
Organization of studs, bars, lag screws and eye screws to form the frame:
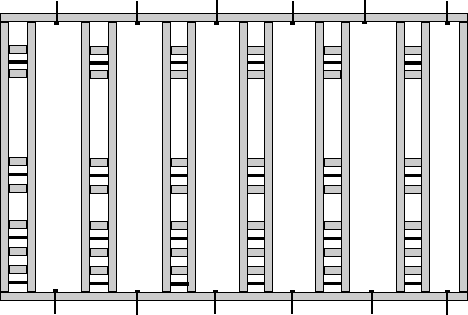
This same structure with 3/4" plywood covering the frame and a flush trim strip at the bottom to connect it to an uneven floor. The 3/4" plywood can also be covered with a white, black or other colored laminate so that it can match the color scheme of your studio or act as an accent wall. With a laminate facing glued to the plywood no screw holes will show - it looks really clean.
Measurements
Horizontally, each set of ropes is 18" apart and is separated from the next set of ropes by 25". All horizontal measurements are "on center." Vertically, the bar for the high ropes is 82" from the floor. The bar for the ropes below them is 40" from the floor. The bar for the optional Viparitta Karani hand hold is about 18" from the floor. The bar for the lowest hole is 2 1/4" down from the top of its hole. The hand hold holes are 4 1/2" square. From the center of the last holes on the extreme right and left sides of the panels you need about 18" further to the right & left sides to put your legs into Baddha Konasana while in Sirsasana. This area does not need to be rope wall, it just needs to be clear for your legs.
Tools required
Hammer, measuring tape, pencil, drill with bits, hacksaw, router with 1" edger and 1/4" to 1/2" round over bit, table saw, ratchet with sockets, large screw driver, template for drilling holes in studs for bars, combination drill and countersink bit, philips or square drive screwdriver bit, "street shoe" applicator, vice, plug cutter, wood glue, sand paper and/or emery cloth strips, drop cloth, saw horses, putty knife.
Optional tools
Screw shooter, sawzall with metal blades or industrial liquid cooled band hacksaw, sawbuck, stud sensor.
Materials required
10/18 round stock steel 1/2" diameter or even better 1/2" anodized aluminum round stock that won't rust, 2 by 4 lumber, 3/4" oak plywood sheets, eye screws (optional), large lag screws (or bolts if necessary) and washers, 16 and 8 penny nails, flat head philips or square drive wood screws, wood putty, 3/4" by 3/4" oak strips, basic coatings "street shoe" ph.# (515) 288-0231. Other tools and materials may be required depending upon your particular installation.
Directions for wood framed structure
For masonry structures, you should get installation advice from a competent carpenter or structural engineer. Find a couple of carpenter friends to help you with the entire project. Schedule a time to close the center for 3 days. Assemble all materials and tools in a workshop ahead of time. Create a template for drilling holes in the studs for the metal bars the pre drill the holes. Pre-cut all 2 by 4's to size (including fire blocks) on the table saw. Make a couple of extras just in case. Move everything to the yoga center and protect the floor with drop cloths. Assemble frame on floor, tilt up and secure in place using large lag screws in shear. Insert metal bars and toe nail in the ends of their holes so that they can not move from side to side (they may rotate in place). Measure from one side wall to find where all the hand hold bays are. Know the vertical distance between hand holds. Attach the oak trim strip to the plywood and custom fit to floor starting from one side wall. Temporarily attach paneling to wall with a few counter sunk wood screws. Drill a blind pilot hole into the plywood sheets for every hand hole. Insert the router bit and cut to the inside borders of the hand hold. Round over the sharp edge of the plywood hand holds using the router. Fill any voids in the cut plywood with the putty. Remove the panels and coat with "street shoe" or 2 part varathane. Replace the panels and install plugs over wood screws. Cut plugs flush with router and touch up with "street shoe". Install eye screws (optional). Clean-up and you are done!
© 2024 BKS Iyengar Yoga Centers of San Diego, Inc. All rights reserved.
